
5 Essential Tips for Pathway Lighting Design
Table of Contents
- Plan Fixture Placement and Spacing for Safety and Aesthetics
- Choose the Right Color Temperature for Outdoor Pathway Lights
- Select Weather-Resistant Materials and Durable Fixtures
- Balance Ambient and Task Lighting for Functional Design
- Optimize for Energy Efficiency and Low-Voltage Systems
- Incorporate Smart Home Integration and Dark Sky Compliance
- Know When to Call a Professional vs. DIY Installation
- Frequently Asked Questions
Last Updated: September 27, 2026
Plan Fixture Placement and Spacing for Safety and Aesthetics
Proper fixture placement and spacing form the foundation of effective pathway lighting design, determining whether your walkway feels safe, welcoming, and visually balanced.
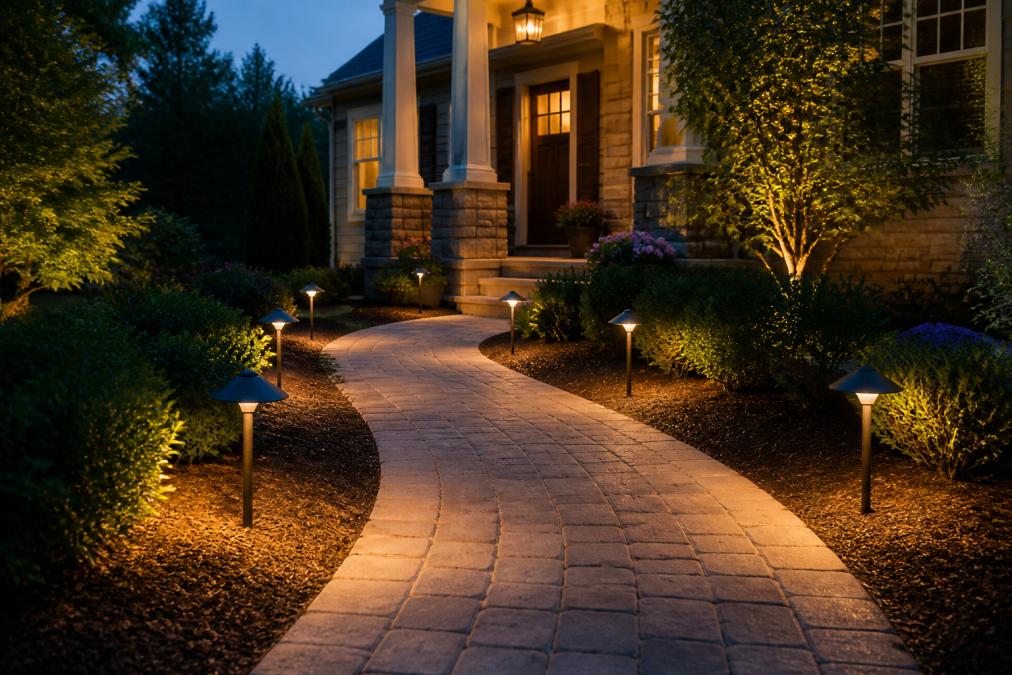
Most homeowners space lights too far apart or unevenly, creating dark zones and harsh bright spots. The optimal spacing depends on pathway width, fixture brightness, and foot-candle requirements.
Understanding Foot-Candle Requirements
Pathway lighting effectiveness is measured in foot-candles. Most pathway applications require 0.5 to 1 foot-candle of illumination at ground level for safe, natural-feeling navigation.
For comparison:
- Residential pathways and garden walks: 0.5-1 foot-candle
- Driveways and entry approaches: 1-2 foot-candles
- High-traffic commercial walkways: 2-5 foot-candles
- Dark sky-compliant designs: 0.2-0.5 foot-candle (using shielded fixtures)
A typical low-voltage LED pathway light produces 50-150 lumens with a 90-120-degree beam spread, translating to roughly 0.5-1 foot-candle at 6 feet away.
Calculating Optimal Spacing
For standard residential pathways, space fixtures 6 to 8 feet apart with 50-100 lumen LED fixtures. Adjust spacing based on:
Fixture brightness: A 150-lumen fixture can space 8-10 feet apart; a 50-lumen fixture works better at 4-6 feet.
Pathway width: Narrow paths (2-3 feet) need fixtures on one side only, spaced 6-8 feet apart. Wider pathways (4+ feet) benefit from alternating placement on both sides, allowing 8-10 feet between fixtures.
Slope and terrain: Sloped pathways lose illumination efficiency as light spreads over uneven ground. Reduce spacing by 20-30 percent on slopes steeper than 10 degrees.
Voltage drop: A 12-volt system running 100 feet on 10-gauge wire experiences 2-3 volt drop, reducing brightness 15-20 percent. Compensate by spacing fixtures 1-2 feet closer at the far end, or upgrade to 8-gauge wire for longer runs.
Placement Principles for Even Coverage
Consider these placement strategies:
- Alternating sides: Place lights on alternating sides for balanced coverage and to avoid harsh shadows.
- Curves and transitions: Position fixtures closer (4-6 feet) on curves, steps, and slope transitions.
- Edge setback: Keep lights at least 2 feet from the path edge to avoid tripping hazards.
- Straight sections: Space fixtures 8-10 feet apart on straight sections.
- Entryways and hazards: Add extra lights at steps, elevation changes, and surface transitions.
Troubleshooting Uneven Illumination
If your pathway lighting feels patchy or overly bright in spots:
Dimming at the far end: This indicates voltage drop. Check wire gauge (should be 10-gauge or larger for runs over 50 feet) and verify transformer capacity matches your total wattage load.
Dark zones between fixtures: Reduce spacing by 1-2 feet, or upgrade to higher-lumen fixtures. Alternatively, angle fixtures slightly inward to overlap beam coverage.
Harsh shadows or glare: Fixtures mounted too high or aimed too steeply create harsh shadows. Keep pathway lights 12-18 inches above ground and aim straight down or at a shallow 15-degree angle.
Inconsistent brightness across width: Use alternating placement on both sides of the pathway rather than single-side placement. This distributes light more evenly across the walking surface.
Professional design accounts for pathway width, surface reflectivity, vegetation, and terrain slope, ensuring even light distribution and proper voltage management.
Choose the Right Color Temperature for Outdoor Pathway Lights
Color temperature controls how warm or cool your pathway lighting feels. This choice affects both aesthetics and function.
Color temperature is measured in Kelvin (K). Lower numbers (2700K-3000K) produce warm, inviting light; higher numbers (4000K-5000K) create cooler, brighter light.
For residential pathways, warm color temperature (2700K-3000K) mimics natural twilight, creates a welcoming atmosphere, and enhances landscape features.
Commercial applications often use neutral white (4000K) for better visibility and security.
Key considerations: warm light (2700K) suits residential spaces; neutral white (4000K) works for commercial properties; avoid mixing temperatures; LED fixtures offer seasonal flexibility.
A consistent, well-chosen color temperature ties your entire outdoor space together visually.
Select Weather-Resistant Materials and Durable Fixtures
Outdoor fixtures face constant exposure to rain, snow, temperature swings, and UV damage. Material selection determines how long your pathway lighting system lasts.
Look for fixtures made from powder-coated aluminum or galvanized steel, which resist rust and corrosion far better than bare metal.
Aluminum is lighter and easier to install; galvanized steel is more durable in coastal environments. Either outlasts uncoated fixtures by years.
Check the IP (Ingress Protection) rating on all fixtures. An IP65 or IP67 rating means the fixture is dust-tight and fully protected against water jets. Lower ratings like IP44 may fail during heavy rain or snow melt.
Durable fixture features include sealed lens assemblies, stainless steel fasteners, tempered glass or polycarbonate lenses, corrosion-resistant gaskets, and UV-stabilized plastics.
Low-voltage fixtures typically last 10-15 years; higher-quality materials extend this to 20+ years. Cheap fixtures often fail within 3-5 years.
Balance Ambient and Task Lighting for Functional Design
Pathway lighting design requires two types of light working together: ambient illumination and task lighting.
Ambient lighting creates overall visibility and sets the mood; task lighting highlights specific features or hazards needing extra attention.
Ambient illumination comes from evenly spaced pathway lights mounted low to the ground, preventing harsh shadows. Most residential applications use 0.5-1 foot-candle.
Task lighting adds focused light to specific zones:
- Bright uplighting on architectural features or plantings
- Accent lighting on steps or elevation changes
- Downlighting from overhead fixtures at entry points
- Spotlighting on specimen plants or water features
The balance determines whether your pathway feels inviting or institutional. Too much task lighting creates chaos; too little ambient light leaves unsafe dark zones.
A well-designed system uses ambient light as the base layer, with task lighting adding visual interest. This layered approach provides flexibility as your landscape changes.
Optimize for Energy Efficiency and Low-Voltage Systems
Low-voltage lighting systems deliver significant savings in operating costs and environmental impact compared to line-voltage fixtures.
Low-voltage systems run on 12 volts instead of 120 volts, making them safer to install and operate while reducing energy consumption dramatically.
LED fixtures consume 75-90 percent less energy than incandescent or halogen alternatives. A typical LED pathway light uses 4-8 watts versus 20-50 watts for halogen, adding up to real seasonal savings.
Low-voltage LED benefits include minimal transformer losses, instant on-off, long lifespan (25,000-50,000 hours), dimming capability, and no heat generation that attracts insects.
A 60-watt halogen system running 10 hours nightly costs far more than a 6-watt LED system with identical brightness.
Transformer capacity matters for voltage drop. Undersized transformers or improper wire gauge cause dimming at the far end. Professional installation ensures correct sizing.
Incorporate Smart Home Integration and Dark Sky Compliance
Modern pathway lighting systems integrate with smart home platforms. This adds convenience and opens new possibilities for energy savings and seasonal changes.
Smart controls let you adjust brightness, color temperature, and timing from your phone, with voice command support and automation schedules that dim lights during late-night hours.
Dark sky compliance is increasingly important for responsible outdoor lighting. Dark sky-compliant fixtures direct light downward only, preventing upward light spill that affects wildlife and wastes energy.
Smart integration features include scheduling, motion sensors, seasonal adjustments, security system integration, remote control, and energy reporting.
Dark sky-compliant fixtures use shielding and design to prevent light from escaping above the horizontal plane.
Know When to Call a Professional vs. DIY Installation
Your comfort with electrical work and the system's complexity determine whether to hire a professional or DIY. Low-voltage systems are simpler than line-voltage, but require understanding key technical requirements.
Why Low-Voltage DIY Is Feasible
Low-voltage systems (12 volts) are safer than line-voltage (120 volts), requiring no permit in most jurisdictions, offering no electrocution risk, simpler connections, easier troubleshooting, and faster installation without deep trenching.
DIY Installation Checklist
DIY installation works well if you have: straightforward layout (under 100 feet), transformer access within 25 feet, experience with electrical connections, 8-16 hours available, proper tools, and knowledge of local code (NEC Article 411 typically specifies wire run limits, 6-inch burial depth, grounding, and transformer protection).
When to Hire a Professional
Professional installation becomes necessary, or strongly recommended, for:
Complex layouts: Multiple pathway zones, branching circuits, or more than 150 feet of total wire run. Calculating correct wire gauge and transformer capacity for branched circuits requires experience.
Cost-Benefit Analysis
DIY pathway lighting system (50-75 feet):
- Fixtures, transformer, wire, connectors: $150-$400
- Your labor: 8-16 hours
- Total cost: $150-$400
- Risk: Mistakes may require professional troubleshooting ($150-$300)
Professional installation (same scope):
- Materials: $150-$400
- Labor (8-12 hours at $75-$150/hour): $600-$1,800
- Total cost: $750-$2,200
- Benefit: Warranty, code compliance, system testing, and peace of mind
For simple systems, DIY saves $600-$1,800. For complex systems, professional installation prevents costly mistakes and ensures code compliance.
Common DIY Mistakes to Avoid
Undersized transformer: Choosing a 60-watt transformer for a 100-watt system causes voltage drop and dimming. Calculate total wattage (sum all fixture wattages) and choose a transformer rated 20-30 percent higher.
Frequently Asked Questions
What is the rule of thumb for spacing pathway lights?
Space pathway lights 4 to 6 feet apart along walkways to create even illumination without dark gaps. For curved pathways, maintain consistent spacing around bends. This distance balances foot-candles (typically 5 to 10 foot-candles for safe navigation) with fixture efficiency. Wider spacing works on straight paths; closer spacing suits curves and transitions. Test spacing during evening hours to confirm coverage before finalizing installation.
How do I choose the right color temperature for outdoor pathway lights?
Select 2700K to 3000K color temperature for warm, inviting pathways that feel natural and reduce glare. Warm tones (2700K) suit residential properties and create soft transitions between indoor and outdoor spaces. Cool tones (4000K+) work for commercial or security-focused areas but can feel harsh on home landscapes. Match color temperature across all fixtures for visual consistency. Warmer temperatures also enhance architectural features and landscape elements without appearing artificial.
What makes low-voltage pathway lighting systems more reliable than standard systems?
Low-voltage systems (12V) operate safely at reduced power. They use smaller gauge wire, reducing installation complexity and damage risk. Low-voltage transformers regulate consistent power delivery across longer runs. LED efficiency paired with low-voltage design extends fixture lifespan and reduces maintenance. Professional installation ensures proper grounding and circuiting.
Can pathway lighting look natural and subtle, or will it always appear obvious?
Pathway lighting can blend seamlessly into your landscape when designed with restraint. Use warm color temperatures (2700K), position fixtures to highlight natural walkways rather than create artificial brightness, and avoid over-lighting. Accent lighting on architectural features or uplighting on trees creates depth without appearing staged. Proper spacing prevents harsh shadows and unnatural brightness. Professional design focuses on function and safety while maintaining the property's natural nighttime aesthetics, not transforming it into a showpiece.