
Design Architectural Lighting for Historic Homes
Table of Contents
- Understanding Layered Lighting for Historic Homes
- How to Light a Brick House Exterior at Night
- Matching Lighting to Architectural Style
- LED Retrofitting for Historic Fixtures
- Best Practices for Historic Home Lighting
- Smart Home Integration Without Compromising Historic Charm
- DIY vs. Professional Installation: What You Need to Know
- Frequently Asked Questions
Last Updated: September 26, 2026
Understanding Layered Lighting for Historic Homes
Layered lighting is the practice of combining three distinct lighting types, ambient, task, and accent, to create depth, visual interest, and functional illumination in a space. For historic homes, this approach is essential because architectural lighting historic homes allows you to honor the property's character while meeting modern lighting needs. When done correctly, layered lighting enhances period-authentic details without overwhelming the home's original aesthetic.
Historic structures feature intricate moldings, stonework, and brick facades that deserve to be seen. A single overhead fixture flattens these features. Layered lighting, combining ambient light for general visibility, task lighting for specific activities, and accent lighting to highlight architectural elements, reveals the home's true character while maintaining period warmth and intimacy.
Ambient, Task, and Accent Lighting Defined
Ambient lighting provides foundational illumination for safe movement and general visibility. In historic homes, it typically comes from ceiling fixtures, wall sconces, or recessed lights positioned to avoid harsh shadows on architectural details.
Task lighting is directed illumination for specific activities like reading, cooking, or desk work. It's brighter and more focused than ambient light, positioned to eliminate shadows. Examples include pendant lights over a kitchen island or desk lamps in a study.
Accent lighting highlights architectural features or artwork to create visual drama and depth. Examples include uplighting a brick chimney, grazing light across crown molding, or backlighting a stained-glass window. It is typically the brightest and most directional of the three types.
Why Layering Matters in Period Homes
Historic homes have character in their details: original brick texture, wooden trim craftsmanship, and period-appropriate proportions. A single light source washes out these details. Layering allows each type of light to do its job without competing.
Layering provides flexibility: quiet evenings use only ambient lighting, while entertaining combines task lighting in the kitchen with accent lighting on architectural features. This mirrors how period homes were lit by multiple sources, candles, gas lamps, and individual fixtures throughout rooms.
How to Light a Brick House Exterior at Night
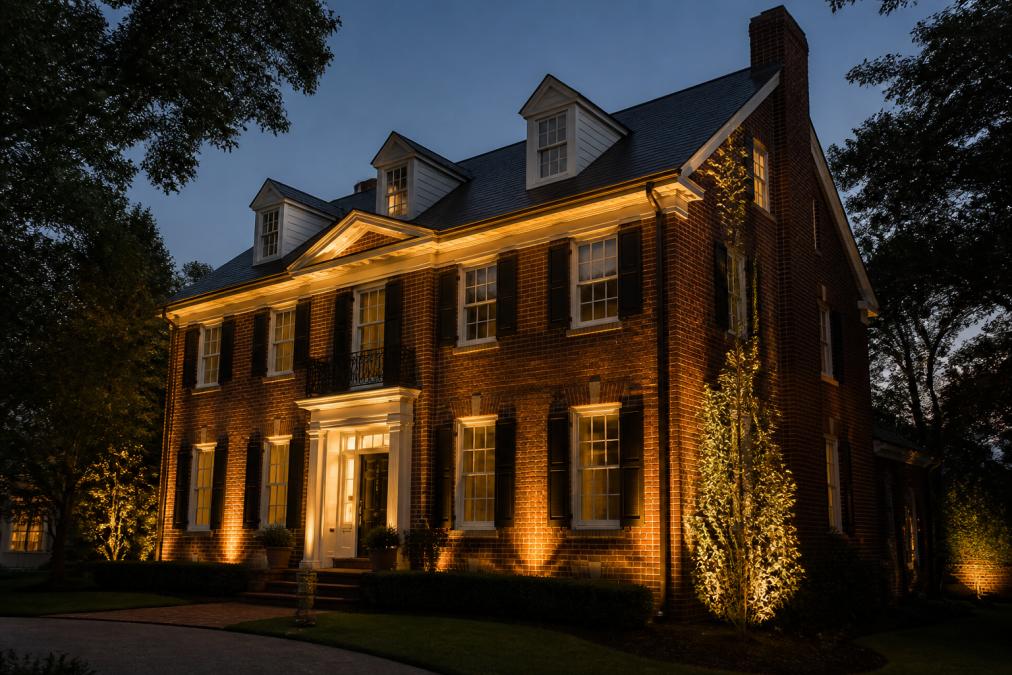
Exterior brick is rewarding to light because texture catches light beautifully, creating depth and shadow that reveals masonry craftsmanship. Light direction determines what the viewer sees.
Uplighting and Downlighting Techniques
Uplighting positions light sources at ground level, directing light upward. It emphasizes brick texture, creates dramatic shadows revealing masonry depth, and makes the home appear larger, enhancing curb appeal.
Downlighting positions fixtures on soffits, eaves, or trees, directing light downward. It's more subtle than uplighting and works well for entryways, walkways, and architectural details like cornices and trim, creating softer shadows and naturalistic appearance.
For brick facades, uplighting showcases texture. For entryways or trim, downlighting is more flattering. Many designs use both to create layered visual interest.
Fixture Placement and Spacing
Space uplights 6 to 10 feet apart along the foundation, depending on beam width and wall height. Too-wide spacing creates dark gaps; too-close spacing creates harsh lines and wasted light.
Position uplights 2 to 4 feet from the wall base to allow light to spread upward, creating even coverage. Too-close placement creates a bright band at the base; too-far placement wastes light.
For downlighting, position fixtures on soffits or eaves so light reaches the facade at a 45-degree angle. Test positioning during installation, as field adjustments are often needed.
Matching Lighting to Architectural Style
Architectural lighting for historic homes means more than just illuminating the structure; it means lighting in a way that respects and enhances the home's period style. A Victorian mansion demands different lighting than a Colonial farmhouse, not just in fixture style but in how light is deployed across the exterior.
Colonial and Federal Period Fixtures
Colonial and Federal homes (1700-1820) are characterized by symmetry, restraint, and classical proportions. Fixtures should be understated, simple lanterns, sconces, or recessed lights, so light, not the fixture, is the focal point. Maintaining this delicate balance of illumination requires stable electrical systems, as the process of troubleshooting flickering lights often reveals underlying wiring issues that threaten the integrity of these historic interiors.
Position fixtures symmetrically around entries and facades. Uplighting should be subtle and even, emphasizing clean architectural lines. Use warm light (2700K or lower) to mimic candlelight these homes were designed for.
Victorian and Craftsman Homes
Victorian homes (1837-1901) embrace ornamentation, allowing more dramatic, layered lighting on decorative details, gables, turrets, and ornamental brickwork. Craftsman homes (1905-1930) emphasize handcrafted details and natural materials; lighting should showcase these without appearing artificial.
For both styles, use a mix of uplighting and downlighting to create depth. Highlight architectural features that define the style: decorative brickwork, carved woodwork, or stone details. Fixture finish matters, oil-rubbed bronze or unlacquered brass work well for both styles, as these finishes age naturally and complement period materials.
LED Retrofitting for Historic Fixtures
Many homeowners want to keep original fixtures but upgrade to LED for efficiency and reliability. This is possible, but it requires careful attention to color temperature and fixture compatibility.
Preserving Original Fixture Shells
Original fixtures often have value, both aesthetic and historical. Rather than replacing them, retrofit the internals with LED components. This preserves the fixture's appearance while gaining the benefits of modern technology.
Work with a professional who understands historic fixtures.
Color Temperature and Period Accuracy
Color temperature, measured in Kelvin (K), describes whether light appears warm (yellow-orange) or cool (blue-white). Historic homes were lit by candlelight (around 1800K) and early gas lamps (2000-2200K). These warm color temperatures defined period interiors and exteriors.
Best Practices for Historic Home Lighting
Successful lighting design for historic homes balances aesthetics with function and follows a deliberate process.
Conducting a Lighting Audit
Start by assessing what you have and what you need. Walk your property at night and note:
- Which areas feel too dark or too bright
- Which architectural features are visible and which are hidden in shadow
- How existing fixtures (if any) illuminate the home
- How neighbors' lighting affects your property
- What activities happen in each outdoor space (entertaining, circulation, security)
This audit informs your design. If the front facade is dark, uplighting might be the answer. If the entry is harsh and uninviting, downlighting with warm color temperature could help. If architectural details are invisible, accent lighting becomes a priority.
Electrical Code Compliance and Safety
Historic homes often have outdated electrical systems. Before installing new lighting, verify that your electrical infrastructure can support additional load. Knob-and-tube wiring, common in homes built before 1950, should not be extended or modified without professional guidance. This wiring lacks proper grounding and is a fire hazard if overloaded.
Smart Home Integration Without Compromising Historic Charm
Smart lighting, controllable via smartphone or voice commands, offers convenience and flexibility. The challenge is integrating this technology without making a historic home feel modern or artificial.
DIY vs. Professional Installation: What You Need to Know
DIY risks include:
- Improper fixture placement, leading to uneven or unflattering illumination
- Electrical mistakes that create safety hazards or system failures
- Damage to original siding, roofing, or architectural details during installation
- Inadequate waterproofing, causing corrosion and early fixture failure
- Non-compliance with local electrical codes
Professional installation offers:
- Expertise in lighting design specific to your home's style and architecture
- Proper electrical installation with code compliance
- Careful attention to fixture placement and spacing for optimal results
- Warranty on both equipment and labor
- Access to professional-grade fixtures and components unavailable to consumers
| Lighting Type | Best For | Typical Color Temperature | Fixture Examples |
|---|---|---|---|
| Ambient | General visibility, safety | 2700K (warm) | Recessed lights, wall sconces, ceiling fixtures |
| Task | Specific activities, work areas | 2700K-3000K | Pendant lights, desk lamps, directional sconces |
| Accent | Highlighting architectural details | 2700K (warm for authenticity) | Uplights, downlights, spotlights, grazing lights |
The International Dark-Sky Association provides guidance on outdoor lighting that minimizes environmental impact while maintaining visibility. This is particularly relevant for historic homes in established neighborhoods where light pollution affects neighbors.
Frequently Asked Questions
What is the 5'7" lighting rule for historic homes?
The 5'7" rule suggests placing accent lighting fixtures at or above eye level to avoid glare and create visual comfort. In historic homes, this principle helps highlight architectural details like cornices, trim, and stonework without creating harsh shadows or drawing attention to the fixtures themselves. Proper fixture placement respects the home's proportions and preserves period authenticity.
How do I design architectural lighting for a historic home without damaging original materials?
Work with professionals experienced in historic preservation to plan fixture locations before installation. Use non-invasive mounting methods where possible, and avoid drilling into original plaster, wood, or masonry. LED retrofitting allows you to preserve original fixture shells while upgrading to modern, energy-efficient technology. A lighting audit identifies the safest installation points and minimizes structural impact.
What color temperature should I use for period-authentic lighting?
Warm color temperatures (2700K-3000K) match the soft glow of incandescent and gas lighting common in historic homes. This range creates an inviting, period-appropriate aesthetic while maintaining visual comfort. Cool temperatures (4000K+) can feel jarring in historic settings. LED retrofitting makes it easy to select and adjust color temperature to match your home's original era and architectural style.
Do I need an electrician for architectural lighting in a historic home?
Yes. Historic homes often contain outdated wiring systems like knob-and-tube that require professional assessment and code-compliant upgrades. A licensed electrician ensures your system meets current building codes, protects your home's structural integrity, and provides the safety and warranty protection a DIY approach cannot. Professional installation also prevents costly mistakes that can damage original materials or create fire hazards.